Which WordPress Plugins do you actually need?

Which WordPress Plugins do you actually need?

Which WordPress Plugins do you actually need?

This page contains affiliate links to products and tours that I have used for my own travels, purchased & enjoyed. Clicking these links does not cost you anything, however doing so will support Blue Eyed Compass and allow the site to continue. THANK YOU! You can view our disclosure page for additional details

They say that WordPress is the best option when it comes to choosing a content management system (aka where you should create your website). And as someone who uses WordPress exclusively for herself and her clients, I say that same thing. However, I also understand that WordPress isn’t always the easiest or most kind platform to new users, who may be expecting a turn key process.

The selection of WordPress plugins is no easy feat to sift through. And it can be frustrating spending your time trying to test out and decide which ones to add, activate or remove. So, let’s go through which WordPress plugins you actually need for a blog site.

What is a plugin?

It’s important for us to review what the heck a plugin even is. A plugin is simply a software component that adds or upgrades a specific feature to an existing program or code. Think of it like a sparkly add-on to your WordPress site. Plugins enhance your website’s capabilities, and do so in a way that doesn’t require backend coding from you.

Think of it like you’re buying a car. You can purchase a standard car for a flat fee, and then you can add on fun things to your car – heated seats, bluetooth, nos! (..ok, so you can’t really add nos to your car like in the Fast & the Furious, but hopefully you understand where I’m headed with this analogy.)

Why do I need to/should I use plugins with WordPress?

There seems to be two schools of thought when it comes to using plugins:

(1) Why do I I need all of these things? Won’t it make my site load slower. And

(2) Give me all of the plugins!! They make my site so much easier to manipulate since I’m not tech-savvy.

My professional opinion lies right in the middle of those two.

Adding & activating every plugin you can think of is not a good idea. Doing so will make your website load slow. And a slow loading website is a website where very few people visit… because so few people will wait for a page to load, and search engines like Google will robotically wave their finger at your site as well.

But if you aren’t a web developer and your focus is on creating great content in the form of written posts, photos or videos, then plugins come in handy to help your site succeed without hours or time spent learning a difficult skill (web development), or thousands of dollars spent paying someone to do it for you.


So, with those excellent benefits of time & money savings, let’s dive into the…

Top WordPress Plugins for every WordPress blog site:

Akismet Anti-Spam : the solution is in the name, Akismet prevents spam from overtaking your WordPress site. I’m not sure why anyone is still spamming websites with spam-filled comments, but it happens and this plugin will keep your site safe from those spammers. #howmanytimescanIwritethewordSPAM

Broken Link Checker : If you have a site that’s been around for quite some time and/or you’ve created so many pages and posts over the years, then you’ll want to have the Broken Link Checker plugin. While you don’t need this plugin activated all of the time, it’s great when you’re running updates on your WordPress site.

The Broken Link Checker will show you if any of your links are, well, broken! If you are building a website that you are aiming to rank on search engines with, then as an SEO consultant I can tell you that you’ll want to eliminate any broken links on your site. Google, and other search engines, will ding your site as a ‘no-no’ site if they notice that there are broken links in your website. And this plugin is an easy fix for that.

Image Watermark : If you’re a photographer or post your own photos on your website, you should be using the Image Watermark plugin. What’s great with this plugin is that it will watermark previous uploads, as well as any new image uploads. You can also select which images you don’t want to be watermarked. A watermark on an image prevents image theft, meaning, no one can just copy and paste your high quality image for their own use.

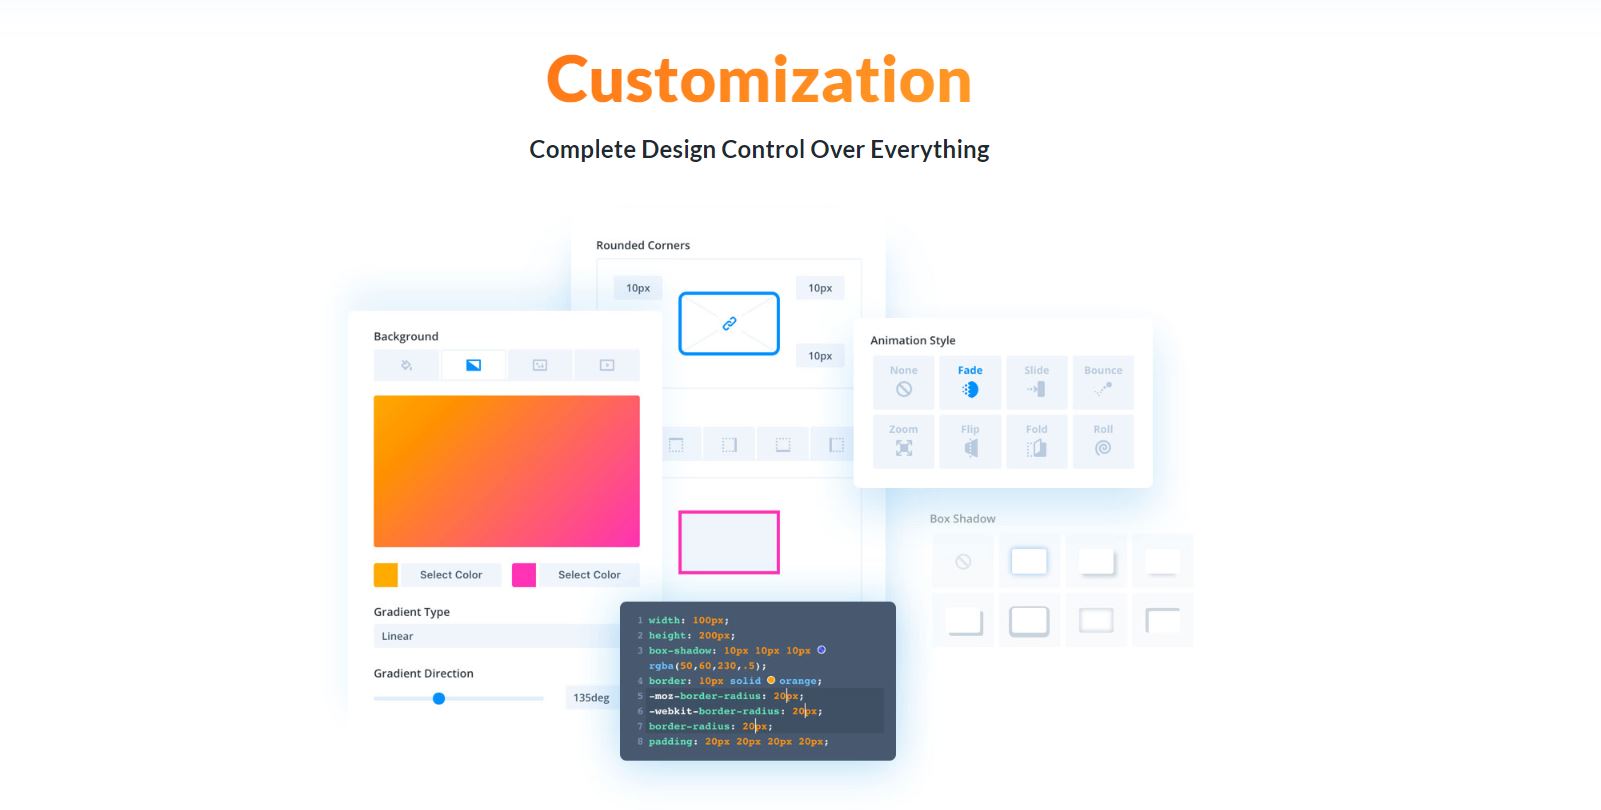
Max Mega Menu : Max Mega Menu is great for any WordPress site creator who wants to be able to adjust the settings & set up of their menus. Instead of being stuck with the standard menu set-up, this plugin will allow you to adjust the menu & page locations easily, as well as set colors for hovers and other CSS capabilities.

Pin it Button : If you are sharing content on your WordPress site, then chances are you will want your site to be seen by lots of people – whether that be readers, potential customers, current customers, subscribers, etc. One of THE best ways to get your content in front of my eyes is through Pinterest. The Pin it Button is a plugin that makes it even easier for your readers to share your images on the Pinterest platform. Readers & site viewers are all about convenience, and this plugin makes it even more convenient for them to save and share your content.

Relevanssi : WordPress is marvelous. It’s the only CMS I recommend for people trying to build a proper website without coding it themselves. But there are parts of WordPress that make it quite difficult for new users to manipulate to work for their site.

One of these issues is the search bar. If you try to search content within your WordPress sites search bar, you will most likely get an odd results page (if anything at all). Enter the Relevanssi plugin. Your users will be able to find your older content more easily, and it will save you hours of frustration trying to figure out how to better your sites search capabilities.

Schema App : You may be asking yourself ‘What the EFF is schema?’. Schema is the structured way to tell Google (or any search engine) how to format your snippets in search. Snippets are those cute little boxes that showcase the outlined information that you search for. They’re great for searchers to see what a page is about before opening it. The Schema App plugin “automatically deploys structured data from the Schema App creator tool into your WordPress site”, meaning it will markup the data you put into it for you, without you having to do it manually. This is another excellent tool for SEO purposes.

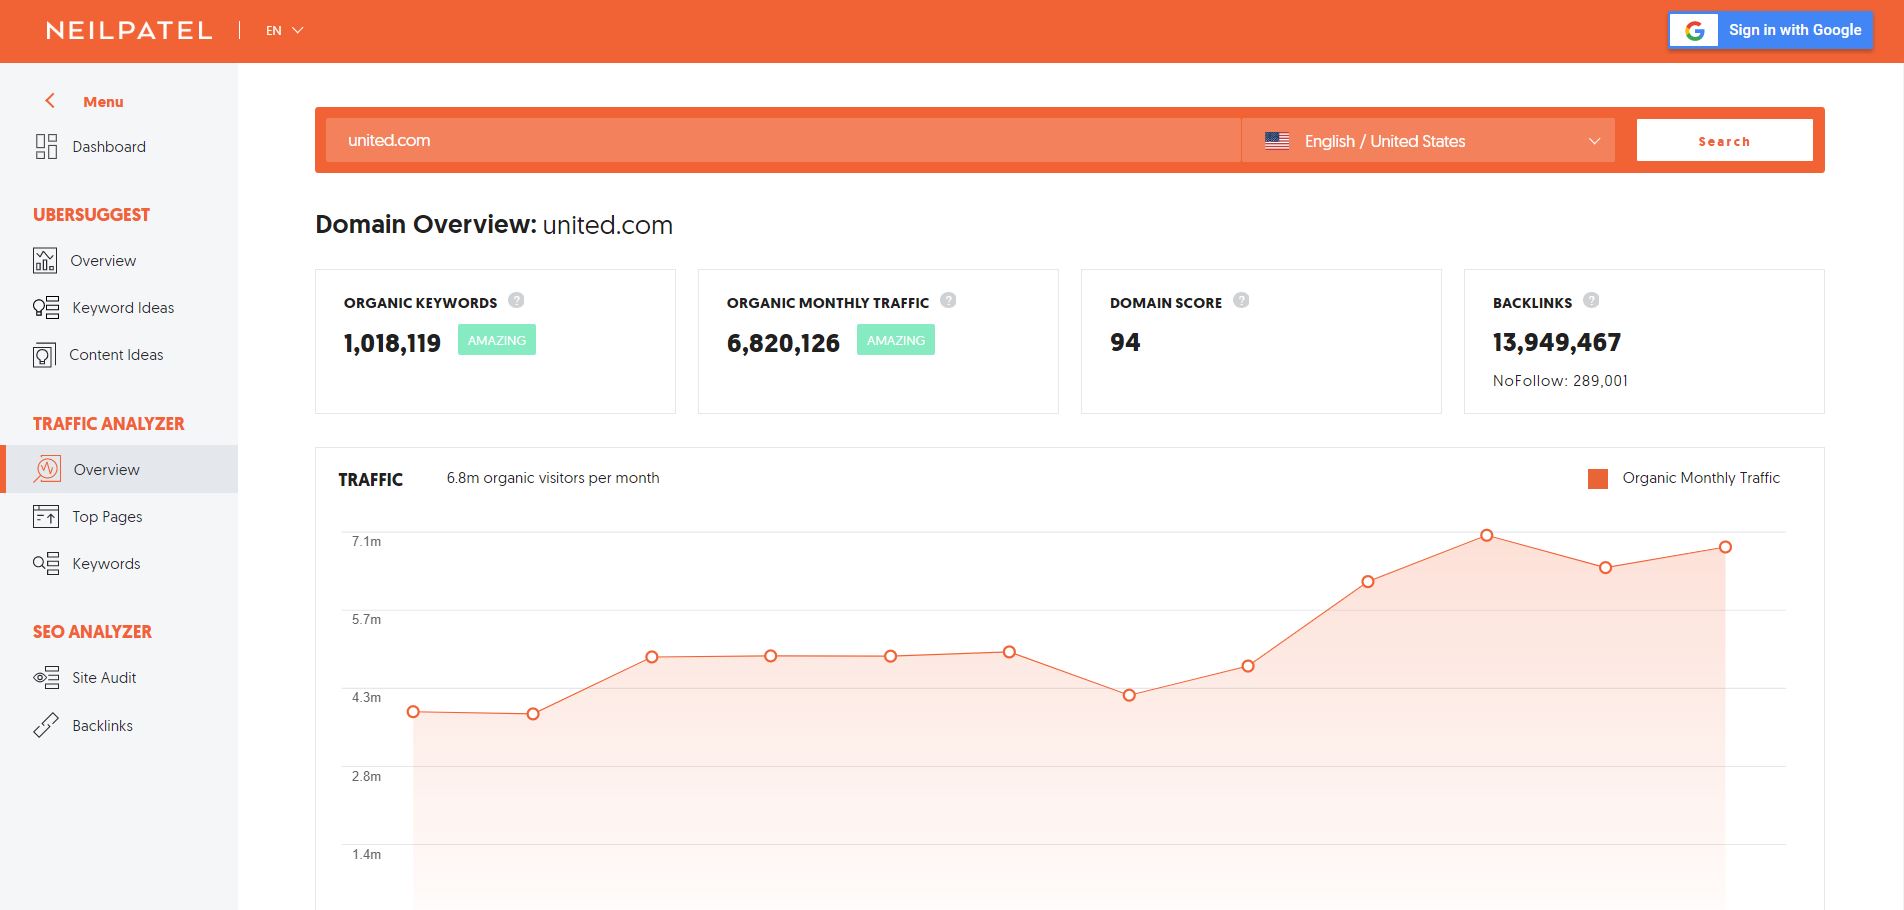
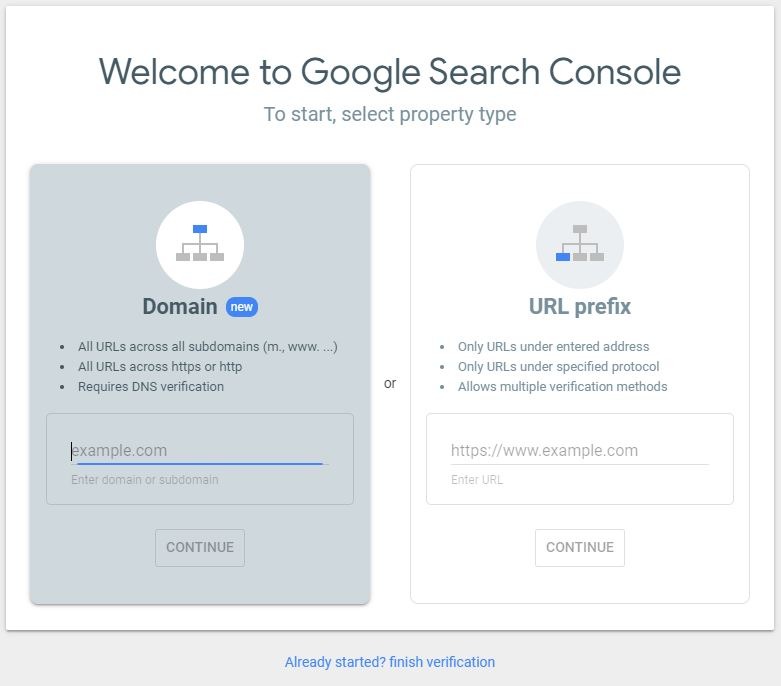
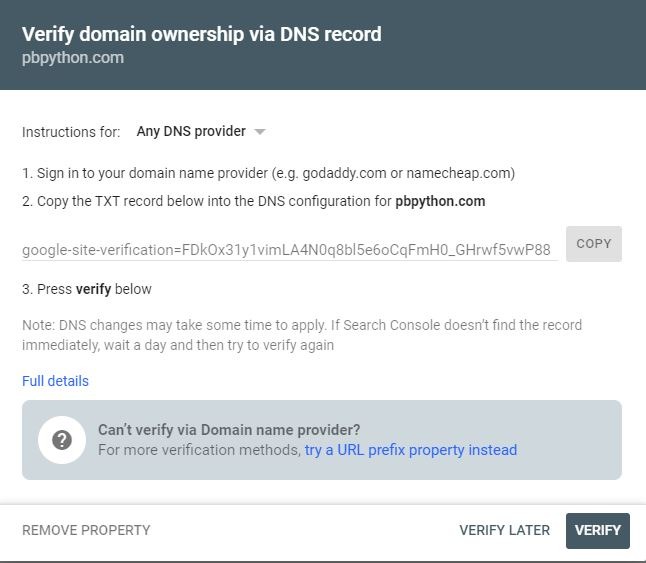
Site Kit by Google : When it comes to a successful site, you need to be able to see & analyze your analytics. Google provides two stellar free products for this called Google Analytics and Google Search Console. If you need help getting these set up for your WordPress site, you can find step by step directions here.

The plugin Site Kit by Google allows you to see your analytics within your WordPress dashboard. That way you don’t have to have multiple tabs open or re-sign in to either platform outside of WordPress. This is basically a time saver. It’s also convenient to have when (and if) you want to incorporate Google Ads onto your site.

Smush : Smush may be the best plugin name that so eloquently explains what it does in the title. Smush is an image compression plugin. One of THE biggest pieces of blogging advice I could give any freshman blogger is to compress your images or make their file size smaller. Otherwise, a few months in you’ll be wondering why your site takes forever to load – you’ll learn that it’s your image file sizes, and then you’ll have to compress them and even possibly have to re-upload them as smaller files.

This is where the Smush plugin comes in handy. With a click of a button you can mass compress all of your images. While there are other image compression plugins out there, I’ve found Smush to be the best functioning.

Grow by Medivina : (previously known as Social Pug) is a social sharing plugin. It incorporates those cute tiny buttons on your posts so that when a user or reader likes your content they can easily share it to their other social media platforms like Pinterest and Facebook.

SOGO Add Script Header Footer : What if I told you that to get certain aspects of your WordPress website running smoothly for your blog or your business, that you needed to add in Javascript coding… say what? Javascript is just one of many web development languages, and while HTML and CSS (other web development languages) are fairly easy to grasp, Javascript is much more dynamic.

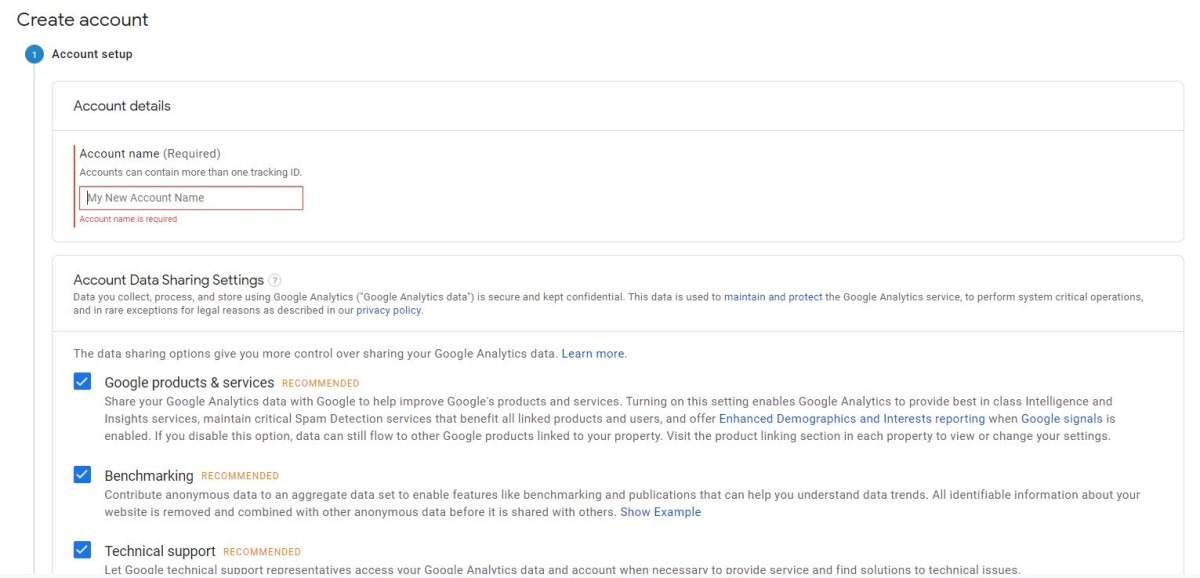
The SOGO Add Script Header Footer plugin allows novice developers or blog & business owners to incorporate javascript and other code into their WordPress site without having to actually go into the backend and mess with the hard written code. It’s incredibly handy & useful, even for things like getting your Google Analytics set up.

UpdraftPlus : Running backups for your website is CRITICAL. I’ll say that again, running backups for your website is C R I T I C A L. Consider this – Imagine you spend 5-8 hours working on your website, whether it’s uploading fresh content or tweaking the design. And then something happens with your hosting service serveror a hacker gets in, and it disappears. All of that painstaking, multi-hour, detailed work you just did has dissipated into the interwebs (just like my dreams of being accepted into Hogwarts, but I digress). UpdraftPlus is the number one back up plugin on WordPress. While this list of plugins is alphabetical, if instead it were by importance, UpdraftPlus would probably be number one on this list.

WP Super Cache : When something is cached, it means that the information, or data, that was visible on your screen has been saved for future use. And when you want to access that data again, it can pull the data much quicker than if your computer had to search for it from the beginning all over again. WP Super Cache does that for your website. Caching is great, especially for mobile users. I started earlier in this post that users want their internet experience to be fast paced & to the point. So if a page is cached, it can be loaded much quicker than if it has to load every line item of code over and over again.

wpDiscuz : Similar to the need for the Relevanssi plugin, you should have a commenting plugin. I recommend wpDiscuz for commenting features on WordPress. It’s easy to use for your users and for yourself on the dashboard side of WordPress. You will need to be the decider in whether you care about having comments on your posts or not. Among bloggers in 2020, opinions on comments tend to go in either direction – either they’re necessary or it doesn’t matter. If you feel they’re helpful in your sites end goal, then you’ll a plugin like wpDiscuz to help make it easier for everyone.

Yoast SEO : Yoast SEO handles some major SEO items that would be much more difficult to handle on your own. SEO stands for ‘Search Engine Optimization’, which, when boiled down, means optimizing your content for search engines to love you > If a search engine loves your page or post (thanks to SEO) than it will boost your link to the top of the search > if you’re link is on the first page of the search, than you will have more visitors to your site > more visitors on your website can equate to more sales, higher ad revenue, etc.

If you’re interested in learning more about SEO, email me! I offer SEO consulting, and will happily give you 30 minutes to one hour of FREE consulting services. The Yoast SEO plugin allows WordPress users to ensure they have the basics of SEO set up for every page and post. They also provide feedback on your written content.

Interested in sustainable travel? Learn about how you can help prevent Overtourism

Hi! I’m Laura, a sustainable travel blogger, as well as freelancing online brand strategist. I share real & honest information about traveling, how to do so sustainably, and ways to earn an income while working remote.

Follow Along!

Start your own blog today!

Set up your blog today by using my discount code for Bluehost – Click the image to get started.

THE Best WordPress theme for bloggers & businesses

Get $15 OFF your AirBnb!

Follow Along

[enjoyinstagram_mb]
Best WordPress theme, the Divi Builder

Best WordPress theme, the Divi Builder

The Best WordPress Theme

the Divi Builder

This page contains affiliate links to products and tours that I have used for my own travels, purchased & enjoyed. Clicking these links does not cost you anything, however doing so will support Blue Eyed Compass and allow the site to continue. THANK YOU! You can view our disclosure page for additional details

You’ve started a blog. You know what your purpose & drive is for it, and you can’t wait to share with the world everything you have to offer. Or you want to build a business – whether it be a blog or not – and your vision for it is practically bursting from your head.

Yet, you’re on WordPress and the free (or cheap) theme you have won’t let you get to that end result you’re craving. So you wake up early on a Saturday determined to get it right, and then you realize that you’ve spent eight hours with little to no luck.

Now you’re officially frustrated and borderline in tears over how angry this whole situation is. A situation in which you didn’t anticipate because you were focused on the value you could bring to others through your site. Not the nitty gritty technical details of it.

Yep. I get it. I’ve been there. And I won’t tell you the number of hours I could have saved myself & the grey hairs I wouldn’t have if it weren’t for the theme stress.

But! I found THE solution to any bloggers or WordPress users technical worries. A solution that will make your dream site come to life without having to pay a web developer to do it. A solution that allows you to spend your time delivering that valuable content to the world.

This solution comes in the form of Elegant Themes Divi Builder. And let me tell you, this bad boy is a game changer!

What is the Divi Builder?

Divi builder is a combination WordPress theme and customizable page builder. It’s considered to be a website building platform, that can easily & effectively replace the traditional WordPress page & post editor. Divi provides a stellar visual builder, which allows users to edit their pages and posts seamlessly & see, in real time, what their edits will look like.

Why use the Divi theme instead of another cheaper theme?

The cost of Divi is much higher than other WordPress themes that you will find. However! If you are a blogger who is looking to convert their blogging passion into a career that allows you to ditch your 9 to 5 job, then the value of Divi Builder will highly outweigh the cost. Because successful bloggers know that it’s key to be strategic with their time.

I have personally used multiple different themes on Blue Eyed Compass, and have wasted hours of my time trying to figure out minor adjustments for those themes. When I could have spent that precious time uploading more content, growing my subscribers or developing my pinterest management growth. And if I had paid for a web developer to make the adjustments I needed then I would have been out a minimum of over $1000 for their time.

As a blogger you should use the Divi theme because it is a wise, long-term growth, investment. It will save you hours (if not days) of your time. And most importantly, it allows users to transform their blog to a budding business.

The Divi Builder is perfect for website owners & bloggers who don’t have a lot of spare time to learn the nitty gritty details of web design and want a high performing & converting website in half the time.

Getting started using Divi

Click here to access the Divi website & purchase your lifetime access theme – you guys, it’s freaking LIFETIME access. I’d like to point out that I’ve used Divi since 2018 and have seen at least three major updates to the theme that as a lifetime access user was able to update for free.

Follow these steps to get started using Divi Builder:

1. Create your account using this link

2. Sign in to your account & download the divi theme to your computer

3. Open up your WordPress admin page :

-Appearance > themes > add new > upload theme

-Upload the divi zip file

*if you’re concerned that uploading the theme will change your site don’t worry. Adding the divi theme will not activate it on your site


4. When you’re ready to work on your site, activate your Divi theme

5. Create a new page

-if you’re starting with your home page title the page ‘Home NEW’, but do NOT publish it or do not link it to any of your menus.

-design this page the way you want your homepage to look & do. Hit publish

-then go to your current homepage (which should look odd as you’ve activated a theme that doesn’t align with what you previously had) & add the ‘Home NEW’ page to your current homepage

-delete your previous homepage content so that it looks like you ‘Home NEW’ page, and publish

-go back & delete the ‘Home NEW’ page

Voila!

Interested in sustainable travel? Learn about how you can help prevent Overtourism

How to use the Divi Theme

Pros of using Divi Builder:

There are so many benefits to using the Divi Builder for your website and blog. The ones that stand out the most to me are:


  • It’s visual page builder– so you can see what changes you are making in real time
  • The drag & drop feature– for easy adjustments that would otherwise take hours of reviewing code to change
  • The backlog of sample sites & pages to pull inspiration from– this is great for those who may need inspiration for design or don’t want to spend time designing a site from scratch. These premade layouts can be adjusted to align with your branding and poof they’re done!
  • Their amazing customer support– if ever there is an issue that you cannot solve on your own, you can easily message customer support & they’ll get back to you within a day. Anytime I’ve utilized Divi’s customer support they have been able to help.
  • The ability to tweak CSS– this takes a bit of coding experience, but if there are minor CSS adjustments that you want made you can do so easily with divi builder
  • Mobile effectiveness– over 50% of most websites traffic comes from mobile users, so it’s more important than ever to have a mobile responsive website. Divi builder allows you to see what your mobile version looks like so you can adjust as needed without going to your phone to check.
  • All of the pre-built ‘modules’ for items like Call to Action buttons, foms & sliders– these pre-built modules are major time savers!

BONUS!!

If you’ve read this far & are considering getting the Divi theme, than I want to offer something special to you for using my link –

If you purchase the Divi theme through my affiliate link I will give you a one hour coaching call completely FREE! The coaching calls I have with clients typically run at $50-$100/hour, but I want to help you succeed with your online goals. We can discuss how to get started with Divi Builder, SEO, site structure, etc. You choose!

First, you need to verify that you used my Divi affiliate link for your purchase by emailing me at [email protected]. Once we confirm that, I will send you a link to schedule your blogging coaching call – super simple!

Here is my link to the Divi Builder theme.

Hi! I’m Laura, a sustainable travel blogger, as well as freelancing online brand strategist. I share real & honest information about traveling, how to do so sustainably, and ways to earn an income while working remote.

Follow Along!

Start your own blog today!

Set up your blog today by using my discount code for Bluehost – Click the image to get started.

THE Best WordPress theme for bloggers & businesses

Get $15 OFF your AirBnb!

Follow Along

[enjoyinstagram_mb]

Best Blogging Tools (for beginners)

Best Blogging Tools (for beginners)

Best Blogging Tools (for beginners)

This page contains affiliate links to products and tours that I have used for my own travels, purchased & enjoyed. Clicking these links does not cost you anything, however doing so will support Blue Eyed Compass and allow the site to continue. THANK YOU! You can view our disclosure page for additional details

When you’re first starting a blog, or are just beginning to create your idea of a blog, it’s easy to become overwhelmed – there are so many skills and platforms to learn about, and everyone has an opinion on what is best. Yet here you are trying to sift through the noise to figure it all out.

I totally understand & can relate to this feeling. Because I felt the same way, even with a boyfriend programmer to help me every step of the way!

It does become easier over time. And with the right tools from the start you can eliminate wasteful hours of trial and error. There are SO many programs, apps, and platforms to use and not every one is worth the time to learn or even pay for. This post will peel back the curtain of the best tools you should have in your arsenal as a beginner blogger.

Below are the best blogging tools for beginner bloggers (*say that five times fast) that are tried and true.

After almost three years of blogging and developing many client site designs on my own, I have a set list of non-negotiable items that any beginner blog should have to run their website and hit the ground running.

Blog Post Prep & Writing

GOOGLE DRIVE

Google Drive is similar to Microsoft Word, but accessible anywhere through your Google account. Which means that you can access your files wherever you can connect to the internet. No more taking up space on your harddrive or having to send files through emails. And the best part is that having a Google account is free, so you have access to an epic organizational tool and file storage system.


TRELLO

Trello is a project management platform that can be used for your to-do lists, brain dumps for post ideas, organizing a project and so much more. It’s a great tool to visually map out your ideas and processes, and is easy to use with its drag & drop methodology.

UBERSUGGEST

If you’re new to blogging you may or may not have heard of this elusive idea of SEO (Search Engine Optimization). There is a lot that comes with learning about SEO, which means there are a lot of tools you can utilize. Ubersuggest is great as it’s an up & coming keyword tool from an SEO guru, Neil Patel, and it’s free to use.

It’s a great way to search for keyword phrases and check out what’s working for your competition – because if you’re creating a blog to monetize it, you don’t want to write about just any topic, you have to be strategic.

Make an impact on the world by making your voice heard –

here are 10 Simple Steps to starting a successful blog

Site Creation & Design Tools

WORDPRESS

WordPress is a content management system that essentially allows novice programmers to create a customized website. It’s a tool that can be extremely useful for anyone who doesn’t want to learn the complexities of coding.

There are various choices when it comes to deciding which platform to build your content onto, such as Wix or Squarespace, however for bloggers looking to grow over the long term with their site, WordPress will be the best option to lay roots down.

BLUEHOST

Bluehost is a web hosting service, and I discuss what that means in greater detail here . Everyone has their own opinions on which hosting service provider is better than another and why, and rightfully so as they’ve most likely had direct experience. However, when it comes to selecting a host provider for a beginner blogger you really don’t need to be paying more than $10/month. Bluehost is an option that offers excellent customer service for those who aren’t super knowledgeable about host servers, is affordable, and can plug into WordPress effortlessly.

I wouldn’t suggest switching to a more powerful provider until your site is at least two years old or has over 75 posts of content on it.

Click here for your hosting service discount.

It’s ONLY $3.95/month. Instead of $7.99

DIVI BUILDER

Any experienced blogger will tell you that they wasted too many hours trying to design their site from a free or cheap WordPress theme, and then they’ll most likely follow it up with how they wish they spent their time on uploading content instead. My favorite solution to this problem is Divi.

The Divi builder is amazing because it is THE best & most convenient way to design your site. You can literally customize the look of your site to look any way you want it to by using its intuitive drag and drop page builder.

CANVA

Canva is amazing for any graphic design item that you need for your blog; from post images, to Pinterest graphics, logo design to infographics. Canva is easy to use (much easier than Photoshop) and there is a free version that supplies everything you will need to start out.


*I personally pay for Canva pro & have loved using it. Here are the things I’m able to do with it that you can’t with the free version:

-download a transparent background png file

-access their premium stock photos

-create folders (organization is my favorite 🙂 )

Marketing Tools

PINTEREST

Where to begin with Pinterest… I tell my clients that Pinterest is in between a search engine and a social media platform (with a heavier lean toward search engine), and it is a stellar way to bring in traffic to your site (…if done correctly). Set up a Business account on Pinterest to get started.

*If you’re confused about how best to manage your Pinterest account please feel free to reach out to me! I will happily give a free consultation to go over where you stand & how to move forward successfully.

TAILWIND

Tailwind is by far the most convenient way to gain traffic & not spend hours on Pinterest. I mention this towards the end of this post, that if someone says that you ‘need’ to spend money on a blogging tool you should wait and consider your decision… with an exception for Tailwind.

Tailwind is a pinterest Pin scheduler that allows bloggers to outline and schedule all of their pins.


*If you aren’t ready to start on Pinterest, wait to purchase an account on Tailwind. If you are ready, then you can use my link here to get a $15 discount on the annual fee! (Plus it helps me save a bit of money as well, which I put back into Blue Eyed Compass so I can continue to help you.)

Interested in sustainable travel? Learn about how you can help prevent Overtourism

WordPress Plugins

UPDRAFT PLUS BACKUP

Imagine having spent hours and hours and hours working on your site, and then later discovering that your content disappeared when you went to adjust a font size or add an image? This is where the Updraft Plus Backup plugin comes in. It will routinely create a backup of your site and store it on a schedule, plus it’s free!

YOAST SEO PLUGIN

There is an endless list of plugins that you could add to your site, but you really only should utilize a select few and Yoast is one of them. I mentioned SEO above and Yoast takes care of a large chunk of the metadata that you should prioritize when it comes to SEO work for your site. Plus, it’s simple to use with great customer service even if you don’t pay for the pro version.

Travel in style with these Sustainably made travel backpacks

Blogging Tools that maybe you need, maybe you don’t:

Depending on how much of a beginner blogger you are, you may not NEED these tools just yet.

Often times bloggers become bogged down with all of the ‘things’ we need to do (research, write, learn WordPress, graphic design, photography, social media, marketing… SO MANY SKILLS!), so I’m listing these tools at the end in case you aren’t at the stage with your blog to commit more time & energy just yet.

My biggest piece of advice for any new blogger is to get your site live and start uploading stellar content. You can adjust everything once it’s live, so don’t spend hours, days, or even weeks trying to understand or pay for everything right away.

*If ANYONE is suggesting that as a new blogger you NEED something that requires payment, you should question why — are they doing it so they can earn money from your purchase? Or are they being genuine in their suggestion… just something to consider.

EMAIL MANAGEMENT Tools

There are quite a few email management tools to choose from. Some are free (Mailchimp) and others require a monthly payment (such as Convertkit), but an email management system will be necessary if you want to monetize your site. It’s a great idea to have one set up on your site immediately, but if you’re feeling overwhelmed with all of the new skills you may be exposed to while starting your blog, then it’s okay to wait a few weeks to set one up.

It’s subjective to each person’s opinion on which program is best. However, the more popular choices are ConvertKit, aWeber and Mailchimp.

GOOGLE ANALYTICS & SEARCH CONSOLE

Google offers two free platforms to review your sites analytics and search results through Google Analytics and Google Search Console. Depending on where you are on your blogging journey, you may want this configured to your site.

However, it’s easy to become obsessed with your stats to a point of distraction, and if you are new, the likelihood that your posts will suddenly skyrocket overnight in Google search results is unfortunately unlikely (although you never know- Keep the faith in your success!)

Go back to my advice on getting your content online first, and THEN spend your time setting up Google Analytics and Search Console. If you’re ready for them both you can find step by step directions here. → *link to ten steps to starting a successful blog post

GT METRIX

GT Metrix will scan your site for its site speed. Site speed is important because (1) users won’t want to stay and wait for your site to load, and (2) Google rewards sites with faster site speed by bumping them up in the results pages.

If you are brand new to blogging, I would wait to worry about this until you have at least 5-10 pieces of content on your site. The language of GT Metrix will be confusing at first and if you don’t have any site visitors yet then don’t worry about it right away.

There are COUNTLESS tools that you can use as blogger. Just keep in mind, the purpose of any ‘tool’ is to help do your blogging work more efficiently. As a beginner, you may not want to spend the majority of your time learning new programs right away. Learn as you go & add on tools as you decide you need them.

Hi! I’m Laura, a sustainable travel blogger, as well as freelancing online brand strategist. I share real & honest information about traveling, how to do so sustainably, and ways to earn an income while working remote.

Follow Along!

Start your own blog today!

Set up your blog today by using my discount code for Bluehost – Click the image to get started.

THE Best WordPress theme for bloggers & businesses

Get $15 OFF your AirBnb!

Follow Along

[enjoyinstagram_mb]

12 Things I Learned Selling Beer

12 Things I Learned Selling Beer

12 Things I Learned Selling Beer

Many experiences in our lives turn into life lessons, if we allow them to. And who would’ve thought selling beer in San Diego would have so many lessons to impart.

After three years, I quit my corporate job in beverage sales. There were many reasons behind this decision of mine, of which I won’t bore you with, except that I chose to pursue what made me happy. And looking back on those years out at bars and sampling beers, I realized that it wasn’t all about the alcohol. Selling beer taught me some important lessons on self growth and professional development.

I can’t say the decision to quit was an easy one, nor was it the most responsible thing I’ve done, but looking back I’ve allowed those life lessons from my time in beverage sales to resonate into so many other aspects of my life. Lessons that I wouldn’t have learned had I stayed comfortably back at home in Pennsylvania or hadn’t challenged myself outside of my comfort zone.

So, with an elated heart here are

12 things I learned while selling beer:

1.) Question your daily basic principles frequently– don’t stick yourself in a rut

Consider what you will stand for & don’t allow others to convince you that you should act below a respectable level to hit a mark or sale. You will be left with an ‘icky’ feeling of having done something dishonorable, and it will come back to bite you in the toosh one day.

2.) You won’t get along with everyone, but you need to pretend to… and it’ll lead to you learning how to understand others

You won’t get along or even like every person that you come into contact with, but that doesn’t mean every person you interact with doesn’t deserve your utmost respect & manners. No matter age, race, religion or political beliefs, every individual has something to offer to the world, and being open to everyone will help you understand the motives of those around you.

3.) Goals are great, but don’t set huge ones you can never achieve.  Aspire, but realistically.

While this isn’t the most inspirational thing I learned, it was important for me. Don’t compare your own success to others. Just because someone was able to accomplish X in a short period of time, doesn’t mean you’ll be able to do the same. There are variables in every situation, and you may have little to no understanding of the work it took for them him/her to get to where they are. You can use others success to motivate yourself, but focus on your own growth & goals.

4.) Hateful words said to you are often not said towards you, they are said due to someone else’s anger, distrust or lack of people skills.  Don’t worry what they think & don’t internalize criticism

This was a big one for me to accept. I’ve lost count of the times a bar manager yelled at me or call me something inappropriate to my face when all I did was greeted them with a ‘Good afternoon!’. At first I was heartbroken. I wasn’t used to someone not liking me or being such rudeness. But after taking the time to consider how to handle these situations I learned that when someone gives you sass or lashes out at you, it is not a direct correlation of you OR your work. It’s more often a reflection of a personal issue of their own showcasing itself outwardly to others.

I’m a sensitive person by nature. I’ve found myself crying after someone has yelled at me & I’ll brew over a single comment made by a friend or colleague for days until I resolve it with them. And I’ve learned that internalizing that criticism will only brew up anxious & negative feelings that won’t serve any purpose in your personal or work life.

Take those hurtful words or actions & let them runoff of you. Be your own water resistant self that deflects negativity.

5.) When you’re focused on delivering great value, rather than hitting a personal number you will be successful.  Change your perception from high numbers to high value & people will perceive you more positively.

Numbers are great ways to evaluate your progress, but they aren’t everything. People are fairly easy to read and when you are focused on numbers & not people or feelings it shows, and they’ll most likely show it right back to you. Focus on the quality of work you deliver and the numbers will follow.

6.) Keep going in the face of adversity.

Not everyone will like you. No matter how sweet or outgoing or polite you may be. Like the saying “You can be the ripest, juiciest peach in the world, and there’s still going to be somebody who hates peaches.” (from Dita Von Teese). If someone doesn’t like you it doesn’t mean you should (a) avoid them or (b) not do your job. Power through the uncomfortable feelings of dislike and you’ll find even greater value in the feeling of surpassing adversity

7.) Push yourself outside of your comfort zone, it’s good for your growth.

Comfort zones are boundaries that are meant to be pushed, adjusted & expanded on. Talking to strangers, discussing things you know next to nothing about, or having to re-negotiate terms are uncomfortable things to do, but once you do it & find that the worse thing that can happen is not that bad, you’ll see how much more of the world is available to you.

8.) Don’t procrastinate.

If you think avoiding something will make it go away, it won’t. Bite the bullet & take care of the task(s) you’re avoiding. You’ll end up feeling much better getting it over with, and find time for more exciting and fun things to do.

9.) Embrace your failures & learn from them.

We aren’t perfect beings. We make mistakes. But it’s important to accept the mistake, take the blame if necessary and adapt. This will make you a better person, a better employee and be someone that others respect.

10.) Sales experience comes in many different forms.

Everyone is a salesperson. Just because you don’t have a direct job in sales, doesn’t mean you aren’t selling something. You may have to pitch ideas for date nights to your significant other, sell the idea of why you need that new gadget or next trip, justify to the clerk why the coupon should be accepted, and even see through the sales funnel of lack luster deals or products.

11.) Learn to define your priorities.

There are only 24 hours in the day. While eight of them should be slated for rest, three for eating, maybe one for working out and meditation/self development, that leaves about 12 hours left in your day. Now, I hope you aren’t working your job for 12 hours a day, so prioritize your time and tasks.

Learning to prioritize will help you get more done with less work, complete work that will move the needle for your work or business, and give you time to focus on what makes you happy.

12.) Focus on the big picture.

Ask yourself, what purpose does this serve? Is it worth my time? Will it move the needle?

These questions will help you prioritize and avoid procrastination (as I listed above), and will also help you understand what is worth your time. As I mentioned before, there are only 24 hours in a day. If what you’re doing right now isn’t part of your big picture of success, then re-evaluate where it should be (or shouldn’t be) in your life.

Hi! I’m Laura, a sustainable travel blogger, as well as freelancing online brand strategist. I share real & honest information about traveling, how to do so sustainably, and ways to earn an income while working remote.

Follow Along!

Start your own blog today!

Set up your blog today by using my discount code for Bluehost – Click the image to get started.

THE Best WordPress theme for bloggers & businesses

Get $15 OFF your AirBnb!

Follow Along

[enjoyinstagram_mb]
Best Camera Gear for Travel Photography

Best Camera Gear for Travel Photography

Best Camera Gear for Travel Photography

This page contains affiliate links to products and tours that I have used for my own travels, purchased & enjoyed. Clicking these links does not cost you anything, however doing so will support Blue Eyed Compass and allow the site to continue. THANK YOU!

Choosing the perfect camera and lens for yourself can be challenging. There is so much information online on professional photography gear, and so many opinions from varying sources, it all becomes contradicting and confusing quickly.

But once you have your perfect photography gear kit you will be able to capture moments of your travels that you can look back on forever.

My love for photography started when I captured one window image on my first trip to Europe, in Rome, Italy. I ended up printing the alleyway image in black and white and still have it sitting prettily on my nightstand next to where I sleep. It’s a momento of the instant that I fell in love with exploring the world and with photography.

My journey to find my best camera gear had a bit of trial and error, and yours will too. Great quality gear is an investment, and like any investment it should be made with careful thought, research and practice.

Here are my tips for how to choose the right gear for your travel photos, and what to keep in mind when looking to purchase camera gear for travel photography.

Included in this post:

  • The basics to look for in professional camera gear for travel photography
  • My tried & true camera gear for my own travels
  • Importance & distinction between the camera body and camera lenses
  • Discussion of New vs Used camera gear

What to look for in a professional camera for travel photography

When you begin your search for camera equipment for your travels you need to consider what you want to use it for and the types of photos you’ll be taking.

For example, do you want to shoot large, lush landscapes or up close portrait shots, or a simple point & shoot image for your own scrapbooks?

For this post, I’ll be covering DSLR and Mirrorless cameras. These are high quality, expensive pieces of equipment rather than a more popular point & shoot camera you may have used in the past.

New to travel photography?

Check out this Superstar Photography course that I studied when I wanted to take photography more seriously.

Just purchasing any camera based on an expensive price does not mean you’ll be getting the best camera. You need to understand what quality is in a camera body and a camera lens.

These are two separate pieces for your camera gear. And any knowledgeable photographer will tell you that the lens is a much more important piece and much bigger investment.

You need to consider three main components of your camera body and lens pairing:

Lens quality

Shutter capability

Sensor quality

Camera & Lens Terms you’ll want to know when reading this:

LENS: your lenses are detachable from the camera body on any DSLR or mirrorless camera. A lens catches the light and feeds it through the shutter to the sensor.

SHUTTER: a shutter is an object that opens and closes on your camera, it’s the barrier between the lens and the sensor. On a DSLR or mirrorless camera, a shutter is one of two ways to control how much light is let into the camera lens through to the sensor.

SENSOR: a camera sensor is inside of the camera body, and impacts your camera’s image quality. The larger the sensor, the more sensitive to light it is, which typically means you’ll end up with better quality images. It also provides better depth of field and color quality.

Aperture: also called an F stop; seen in a lens description as f/#. The LOWER the number, the wider the lens opening can go, which means MORE light can be let it. Aperture is the second of two ways to control how much light is let into the camera sensor.

Focal Length: focal length is the zooms on the lens. Lenses are either fixed or can zoom, and will be seen in a lens description in mm

What to look for in a professional camera for travel photography

Here are all of the items that I bring with me on EVERY trip that I take:

Camera Body:

Sony aR 7 – the Sony Alpha series is a wonderful travel photography camera. It’s a mirrorless camera meaning that is uses only a sensor when shooting versus a DSLR’s mirror to sensor technique. This makes the Sony Alpha series so much lighter than a DSLR camera (however, you must be extremely careful changing lenses, and do NOT clean the mirror or sensor of a mirrorless camera on your own).

I’m in love with the way this camera shoots, the quality of the images it produces, the full-frame sensor and that it connects to wifi so you can easily transfer files. Plus it’s come in handy with video, which we’ve been testing the waters with.

Lenses:

Sony 24-70mm F/2.8 – a favorite among many professionals, this zoom lens is a great go-to travel lens due to its wide range of focal length and lower aperture capabilities.

Sony 28-70mm F3.5-5.6 FE OSS Interchangeable Standard Zoom Lens – This kit zoom lens has been great for travel photos. It’s focal length has proven great for cityscape photos, and has an average aperture that is flexible with daylight images

Sony 16-35mm F/2.8 – another zoom lens, the 16-35mm lens is great for wide angle shots

*this lens is similar to the Sony 24-70mm F/2.8 lens, in both quality and price. I would suggest only purchasing one of these if you are budgeting- purchase based on the zoom depth; if you want to shoot images of further away objects, then you may want the 28-70mm lens.

Sony 85mm F1.8 Telephoto Fixed Prime Lens – By far one of my favorite camera toys to use, I love this telephoto lens. With a wonderfully low aperture of f/1.8, this lens shoots incredible portrait shots. It’s ability to focus and showcase soft bokeh in an image makes it a must use lens for my travels.

Go Pro Hero Action Camera – GoPro has become a household name and for good reason. Their compact action cameras are great for adventure travelers. We love using ours for underwater and hiking adventures.

Find all the best sustainable carry on essentials including the ones you find in this post HERE

Camera Accessories

Tripod this tripod is sturdy yet still lightweight, so it’s been easy to carry around during a day of walking

Sony Remote – if you’re using a tripod and don’t want to have to run back and forth on a 10 second timer, then this remote will be your lifesaver.

Portable Hard Drive – I always back up my images onto a hard drive after a day of traveling. That way I don’t have to worry about running out of space on my HD card for the following day.


Mophie Charger – some carry extra batteries, I carry an extra charger. When I see my battery is half used and I’ll be walking for a bit, I’ll plug in an extra charger to boost my battery up while I’m not shooting. Plus I can also use it for my cell phone- one item for two things!


Cushioned Camera Case – Unless you’re traveling with multiple lenses and cameras you won’t need to dedicate an entire bag to your gear. I use a cushioned case in my carry on backpack for my camera body and three lenses. This case is the best. It protects my camera gear and can easily be pulled out of your bag if you need to do so through airport security.

Go Pro Accessories – there is no shortage of the type of accessories a GoPro owner can utilize. We purchased an accessory pack, like the one linked here and have used almost all of the items during our travels.


All Day Camera Purse – this Lo & Sons bag, Siena, is one of the most used items I have. It easily fits my camera, two lenses and any other item I may need during a day of walking around.

Biggest pieces of advice when purchasing camera gear for travel photography:

  • Lenses are more important than the camera body
  • High-quality lenses will long outlive a camera body
  • Make sure the lens you purchase matches the mount style of the camera body
  • Focus on both your budget and your long term goals; cheaper isn’t better, and neither is spending a ton of money just for the sake of your Instagram account.
  • New vs Used Camera Gear: purchasing new vs used camera gear is a personal preference. I prefer new because I like to be the first person to capture something on a camera. But if you’re budget is lower than go used. Just be sure to check for a warranty, and if buying used on Amazon check who the seller is and look for ‘Certified Refurbished’
  • Unsure which lens to get? Try renting a few and practicing on them!
  • Do NOT attempt to clean your mirrorless camera’s sensor on your own. You can permanently damage your camera. In fact, you should be cautious when changing lenses that no sand, dust or anything else falls into the sensor area.
  • Camera brands will provide a ton of information about the equipment. Don’t equate more bullet points of ‘perks’ as a better camera. You can ignore the built-in flash capabilities and focal range of a camera body.

Do you have a camera questions or need someone to bounce ideas off of? Post your comments below and I’ll get back to you!

Hi! I’m Laura, a sustainable travel blogger, as well as freelancing online brand strategist. I share real & honest information about traveling, how to do so sustainably, and ways to earn an income while working remote.

Follow Along!

Start your own blog today!

Set up your blog today by using my discount code for Bluehost – Click the image to get started.

THE Best WordPress theme for bloggers & businesses

Get $15 OFF your AirBnb!

Follow Along

[enjoyinstagram_mb]

How to Start a Successful Blog

How to Start a Successful Blog

How to Start a Successful Blog

This page contains affiliate links to products and tours that I have used for my own travels, purchased & enjoyed. Clicking these links does not cost you anything, however doing so will support Blue Eyed Compass and allow the site to continue. THANK YOU!

You may have wanted to start a blog for some time now, but have felt unsure how to do so. If you’re at all like me, you may have ZERO technology know-how, so even the mention of ‘setting up your hosting service’ sounds confusing & overwhelming.

Luckily, I had a computer & data science guru at my side (thank you Marcus!) to help me out at the beginning of Blue Eyed Compass. And I’ll be honest, I was still super frustrated most days. It took a while for me to feel comfortable using the platforms, and building out Blue Eyed Compass. Which is why you’re able to read this post about setting up your blog and the basic fundamentals needed.

The blogging industry has grown significantly over the past few years and has become a 7 figure business for many. So release your hesitation & let’s get started!

This is a guide to get the basics set up for a successful blog, and includes some discounts for you as well!

Included in this post:

  • Process of setting up a blog
  • How to write content that people actually want to read
  • My best tools for blogging success (and ones you definitely don’t need)
  • Discounts!

Who is this girl & why should I trust her opinion?

This is something I almost always ask myself when I read someone’s posts about starting a blog. Why should I trust this person’s opinion? What authority do they have to suggest how to successfully create a blog?

SO many of those posts were confusing as heck to me way back when I started as a beginner. With that in mind, this post was created to be easy to understand and actionable for Y-O-U, no matter your skill level with technology.

Blue Eyed Compass officially went live in January 2018, but the idea for this travel blog started months before that. I was inspired by seeing other people be paid to travel the world and write about it, and I thought how hard could that be (actually lol’ing because it’s been much harder than I naively imagined).

Since those first thoughts of wanting to share about traveling, Blue Eyed Compass transformed from discussing how you can travel while working full time to a sustainable travel blog.

I’ve also helped create sites from scratch, have helped countless people with their SEO strategies and am a life-long learner, so I’m always trying to improve my skill set. I’ve also been sold sh*tty blogging courses, have been scammed, sold to and more. Follow the advice of someone who has tried it all and seen what works, what doesn’t and what you can wait to invest in.

Does this help answer that silly question from above?

Steps to setting up a successful blog:

1) Come up with a unique blog name

I suggest coming up with your blog name FIRST because you will need to make sure your domain name is available before continuing past this step.

Definitions

  • DOMAIN NAME: domain names are what’s used in the URL to identify and find a website. Example: my domain name is: BlueEyedCompass.com


  • URL: a URL is the online address of a website.

Example: https://blueeyedcompass.com is my URL. They come in many forms with http, https, www before the domain name and .com, .net, .co and many other possible “Top-Level Domains” (TLD) which you don’t need to worry about other than .com has the most authority on the web, so you’ll want to try to get that. If you really want to use a different top-level domain because your domain name is chosen in under .com, then .net is typically the next best.

While you are contemplating a blog name, you’ll want to keep this thought in mind:

How will you want to brand your site? Will it be your site or an informative news-like site (for example, Blue Eyed Compass is my personal brand, whereas Lonely Planet would be considered an informative site who shares travel information) Typically your blog will be your own personal site, but that will depend on if you want to eventually sell your blog.

How to come up with a creative blog name:

Write out words and/or phrases that you feel associate well with you and what you want your blog to be about. Eventually, a phrase will appear to you on your list. This is actually how I came up with the name Blue Eyed Compass


Make sure your blog name is easy to remember, easy to pronounce & not overdone by hundreds of others

Avoid words such as ‘backpacker’, ‘solo female’, vagabonder’, etc

While creating an easy to remember the name, be sure to toe the line with embracing your uniqueness. I’ve met many bloggers who have created unique spins on travel. Such as caretaker travel, hostel travel, bartender travel and of course my own, sustainable travel.


BLOGGING TIP- I would not choose your name as your blog name. If your blog becomes profitable (which is the hope!) and you want to sell it OR you want to change the topic of your blog, but you’re known in your industry for something else then you don’t want your name attached to it.


Check that your potential blog name is available. Meaning make sure no one else has paid for that domain name and it is available.

Type your potential blog name into a Google search and social media platforms

2) Register your domain name

www.YOURBLOGNAME.com

Now that you have your blog name picked out & checked that it’s available, you can register it so that you have ownership of the name.

There are a few options for where to purchase your domain name. I recommend using Name Cheap or BlueHost. Name Cheap doesn’t up-charge you for registration like other sites (such as GoDaddy). Name Cheap ACTUALLY is the cheapest. They’re also very easy to use, with no hidden fees, unlike many others.

BlueHost, on the other hand, is my recommendation for a hosting service that also can register your domain name *see the next step if you prefer to use BlueHost for both registering your domain name & as your hosting service

Domain name registrations need to be renewed annually, so mark it in your calendar when you need to renew your registration.


Fun fact- I heard that someone once saw that Google’s domain name was available and they purchased it before Google could renew their registration. Imagine Google not owning Google.com… don’t let that be you.

3) Choosing a Hosting Service

Definition

  • HOSTING SERVICE: a hosting service is an internet server hosting service that allows individuals and/or organizations build a website that will be made available to the public with a public IP address.

There are quite a few options when it comes to selecting a hosting service. As a beginner, I would recommend BlueHost. They are especially great if you don’t have a big budget for your blog starting out.

NOTE: it won’t matter to me which hosting company you choose. I’ve used Bluehost for awhile & recommend them highly, but if you’ve already purchased something else, that’s perfectly fine.

Click here for your hosting service discount. It’s ONLY $3.95/month. Instead of $7.99

You can always upgrade to a hosting company that supports a site with LOTS of content, like Digital Ocean, but I always recommend BlueHost and their basic plan to start (you can upgrade your BlueHost plan at any point as well).


Setting up your BlueHost service:

  • Click ‘Get Started’ button, and choose the plan you want

*You can purchase your domain name through BlueHost when you choose your plan, but you don’t have to. We’ve created websites doing both ways, so it’s totally up to you what you prefer to do. If you choose to go with Bluehost it may be easier for you to register your domain name (step 2) & set up your hosting services (step 3) all in one place.


  • BlueHost will ask you for some information to set up your account, as well as your domain name. If you already have a purchased domain name, just enter it in the ‘I already have a domain name’ section. If not, not a problem because your hosting plan comes with a FREE domain name for the first year. You’ll type your desired domain name in the ‘new domain’ box.
  • Fill out the profile information, finalize your plan selection and input your credit card information. Voila! You have the basics of your blog initiated!

TIP: You don’t need the additional services they automatically check for you. Go through and uncheck them all and save yourself some money. While they may seem desirable, it’s possible to have your blog rank high without paying for these extras.


TIP: there is one additional service that I’ve had recommended to me, which is domain privacy. This prevents you from receiving a ton of spam emails. Bluehost will keep your information private with this service.

What I like about BlueHost:

  • They have a reputation of a go-to hosting provider for starting a website & small businesses
  • The onboarding process is seamless. The tech jargon is simplified for you
  • BlueHost has a one-click install to WordPress (*I discuss the WordPress platform in the following step). This easy install is reason enough to use BlueHost.
  • On many hosts, installing WordPress involves difficult downloading, uploading, databases, blah, blah, blah nonsensical items for any tech newbie. Bottom line, having a one-click installation is a blessing.
  • BlueHost loads fast, which is very important, especially to Google and any visitor that comes to your site. No one wants to wait for a page to load.
  • They have excellent customer support. You can chat with knowledgeable & helpful people from BlueHost. Chat or phone, 24/7! If you’re new to blogging, you’ll most likely spend countless hours trying to fix technical issues. With BlueHost, they have your back.
  • There are NO hidden fees. I hate when I sign up for a service only to be surprised with additional fees. BlueHost never does this. You know exactly what you’re paying for.
  • You’ll have security & hack protection. Any site with BlueHost receives a FREE SSL & they utilize SiteLock, which automatically scans your website for malware.

Definition

  • SSL: SSL stands for secure sockets layer, and is a standard trusted security technology certificate. Essentially it shows your site visitors that their data is protected. This certificate is recognized by Google and Bing who considers it a BIG factor to rank higher on their search engines. It’s the ‘s’ in https.

First, click here to get this stellar deal on BlueHosts hosting services (before the discount goes away!)

4) Get your site set up on WordPress

I’ve tested out many platforms for creating a website – SquareSpace, Wix, WordPress – and I only recommend WordPress, especially for bloggers. It’s by far the easiest platform to create beautiful designs and has so many functionalities & plenty of support options.

You can start a blog for free on sites like Tumbler & Blogger, HOWEVER, like a social media profile, you will not truly own your own content. The free platforms will technically own it and are capable of shutting down at any moment. Then all of your hard work will be gone.

There are TWO options with WordPress :

Option 1: a self-hosted site (for example: BlueHost)

Option 2: WordPress managed to host (the URL will be YOURDOMAINNAME.wordpress.com).

Do NOT host through WordPress. Doing so means you are severely limiting what you can do on your site.

*You can either install WordPress on your own or use BlueHosts one-click install option


Setting up WordPress through BlueHost:

Since I’ve recommended using BlueHost as your hosting service I wanted to provide the directions for the one-click install here.


Once WordPress is installed you can select a theme. I suggest uploading a theme later, and I’ll explain why in the next steps. Once installed you’ll receive a confirmation email that your WordPress site is installed & ready to roll.

Definition

  • THEME: Theme is the term used on WordPress to describe the front-end style and layout of your blog site. Its purpose is to help you create the visual look and navigation of your site without you having to code anything on the backend.

*Create a STRONG password for your WordPress account & save it somewhere

STEP 4a) Install your SSL certificate through BlueHost:

Go to your cPanel & click on Security, then SSL and follow the prompts to have it set up via BlueHost. Remember, an SSL is what gives your URL the ‘s’ in ‘https’, and essentially shows Google that your site is secure. Without this, Google will penalize your site rankings.

5) Design your site on paper

Remember I said not to choose your WordPress theme right away? Just like it took time to come up with your perfect domain name, you should take the time to choose the best theme for your blog.

Come up with the page topics you want to be featured on your site, how you want it structured, what features you’d like it to have.


*Fact- 99 out of 100 new travel bloggers want an interactive map on their blog site right away… okay, so this stat is totally made up by me. And I’ll allow the fun to be poked at because I was one of those 99 people who wanted this. If you want a super cool, interactive feature right away, STOP trying to do it. Google does NOT care about your filtering features or your fun maps. Your goal should be to create solid content and start ranking on Google searches. As hard as it might be for you, let go of the floofy additives you want on your site for the time being.

Drawing out the look of your site ideas & then actually creating it is much easier than designing it online right away, especially if you are new to WordPress & web design.

TIP: aren’t sure what you want?

Look at other bloggers sites & screenshot things you like, such as: Fonts, categories, color schemes, site functionality

6) Research WordPress themes & install your choice

Accessing your WordPress Dashboard:

Go to http://www.YOURDOMAINNAME.com/wp-admin

(remember ‘yourdomainname’ is, of course, the domain name you purchased)

Enter your login details


If you completed step 5, then you’ll know what features to look for when selecting your theme, making the process that much easier for you. There are thousands of theme’s available, so knowing what you want will help you narrow down your search.

For my own site and for any web design client that I have, I use the Divi Theme. I’ve used other themes in the past (free and purchased) and I LOVE how Divi allows you to have complete control over your blog design.

Would you rather save yourself the time of setting up your blog & have a professional take care of it for you in 48 hours?

We got you covered, and offer anyone who comes from Blue Eyed Compass a 15% discount on new site set ups!

Install your theme in WordPress by:

  • Go to your Dashboard page
  • Select ‘Appearance’ on the left side column; ‘Themes’ will be the first option selected
  • Click ‘Add New’ at the top left of the page. Here you can search themes or upload a theme, such as the Divi theme

7) Install these top plugins

A plugin is an added resource for your site that easily adds support or substance to your site without having to code anything on the back end of your WordPress site.

Here are the top plugins I recommend installing to your site:

  • Akismet anti-spam
  • Child theme configurator; see step 7a for more details on this
  • Google Analytics for MonsterInsights
  • Relevanssi
  • Smush
  • Social Pug
  • Updraft Plus
  • WP Super Cache
  • WpDiscuz
  • Yoast SEO

7a) Child theme configurator

You will want to use this plugin before you begin changing anything on your theme. A child theme is used to create a duplicate, “child”of your main theme, which will allow you to make changes to the child theme but still be able to make updates to the “parent” theme (the main theme you installed) without overwriting your changes to your child theme. Imagine the child theme is the top layer of a cake. You can decorate it however you want, and the lower layer of your cake stays the same, secure structure.

A child theme is necessary for the purpose of updating your theme on a regular basis for security patches and other upgrades.

8) Build your site!

Now that your WordPress site is set up with your domain name and hosting service, you can design and publish on your blog! Design and build out your main pages, such as your home page and topic pages. Then start creating your blog posts!

But keep in mind, your site doesn’t need to be perfect before you publish your blog posts. I personally spent hours & hours trying to perfect the tiny details of my pages, when I should have been focusing on my blog post content.

9) Create your blog posts

Creating a high performing blog post is not as simple as writing down your musings and uploading them to your site. If you want to have a successful and profitable blog your posts need to be researched, well put together pieces of content that are educational and visually appealing.

Here is what I do for every blog post that I write:

  • Map out the ideas you have; I use Trello to put all of my ideas and organize. They have an app so you can always have a place to write down your ideas, even when on the go
  • Schedule when you want to write them; having a content schedule is key to your blog’s growth. Think about when you should be posting for something, how long it will take to reach your readers, how long it will take to create the content, etc.
  • Compare to competitors; research your competitors content. If someone has written a post on the same topic you want to write about, read through & see what they may be missing. Could you add more content, create an infographic for it, or a video?
  • Outline; just like you were taught in school, create an outline for your post. This helps to make sure your content flows well
  • Edit & optimize for SEO; SEO stands for Search Engine Optimization, and it’s a beast of a tactic for blog growth. Essentially utilizing SEO tactics will help your content to be pushed to the top of the search engines pages. There are hundreds of ways that you can use SEO to help your content rank high, and it can be quite time-consuming. I’ve put together an SEO checklist for beginners that anyone can start using today.

Would you prefer someone else take care of the SEO work for you? We help people build their SEO presence every day! Check this out

  • Upload your content & promote it online; once you upload your content you want to make sure that it looks good on mobile devices and then promote it on your social media channels. The best ones to utilize for bloggers are Pinterest, Instagram and Facebook.

10) Set up Google Analytics & Google Search Console

I put this as the last step because there isn’t much point to you setting these up until you have content for readers. No content, means there isn’t much for Google to rank you for. Focus on that content & then worry about the analytics.

Both Google Analytics & Google Search Console allow you to track your monthly analytics.

It’s good to see what content is driving visitor volume and/or what your viewers like to see/read.

To me, this process of installing both felt complicated, but it’s actually quite simple. Just follow these steps:

Google Analytics

Site visitor based data

  • Fill in your sites Name, scroll to the bottom and click ‘Next’
  • Fill in your website’s details
  • Once you’re done that, you’ll be given a tracking ID. This ID will need to be added to your WordPress site to link Google Analytics. You can add the tracking ID manually or use a WordPress plugin. I use MonsterInsights for Google Analytics. Simply copy & paste your Google Analytics tracking ID into the plugin and it will take you through the steps to verify the ID

Google Search Console

Content based data

  • Go to Google Search Console
  • Click ‘Start now’
  • Since you should already have a login with Google Analytics, use that same login for Google Search Console
  • Once signed in click ‘Add A Property’ button at the top
  • Enter the URL of your website, click continue
  • Copy the TXT record shown on the page & add it to your DNS (where you registered your domain name). You can follow this guide to help show you how to do this with BlueHost.

Definition

  • CRAWL: crawling a page means Google’s little bots scan & index your pages.

If you’re itching to see this data ASAP than you can submit an XML sitemap using the Yoast SEO plugin, which will automatically generate an XML sitemap for your content.

Definition

  • XML SITEMAP: essentially an XML sitemap is a directory of pages that you wish for search engine crawl bots to find & be aware of. When search engines are able to crawl your pages, then they can rank your site.

TIP– Don’t stress over the data too much, especially when you’re just starting out. Content is king when you first start out.


TIP– why do I mention Google so much? What about the other search engines? Google is responsible for the majority of all online searches. So they will have the most accurate data available for you.

To Recap:

1) Come up with a unique blog name

2) Register your domain

3) Choose a hosting service

4) Get your site set up on WordPress

4a) Install your SSL certificate

5) Design your site on paper

6) Research WordPress themes & install one

7) Install the top plugins

7a) Purpose of a child theme

8) Build your website

9) Create high-quality content

10) Set up Google Analytics & Google Search Console

Now you have all the basic steps to setting up your successful blog! If there are points that I missed or questions you have send them to me in the comments below. I’m always happy to help fellow bloggers.

Hi! I’m Laura, a sustainable travel blogger, as well as freelancing online brand strategist. I share real & honest information about traveling, how to do so sustainably, and ways to earn an income while working remote.

Follow Along!

Start your own blog today!

Set up your blog today by using my discount code for Bluehost – Click the image to get started.

THE Best WordPress theme for bloggers & businesses

Get $15 OFF your AirBnb!

Follow Along

[enjoyinstagram_mb]